Posts

Kitchen part 3

Image
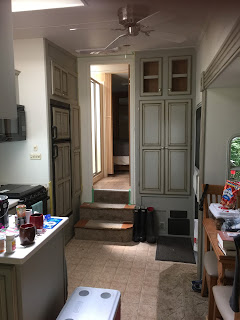
I have finally finished the kitchen cabinets and feel I can post some decent pictures.  It is not finished, we are still updating the counter tops with concrete and have bought a lovely cast iron sink. This is the corner where I feed the dog and always have some of my painting supplies out... It will never be photo ready I added a chalk board to my fridge, our dog meatball eats raw... He also has a lot of food and a metal allergy, the board helps remind anyone who may be caring for him My macrame light fixture still has the wrong bulbs in it... The Edison bulbs are just not good for working or taking pictures I added a coir mat painted the same colour as the island And one for outside I also painted my sideboard to match the island It is finally all coming together

Kitchen Refresh Part 2

Image
After deciding that stripping was not the way to go I needed to pick some paint colours. For the uppers, which were always going to be painted I decided on Benjamin Moore Tapestry Beige... This is one of the most used colours in my house... I have used it on my fireplace surround my Mora clock and current dining table for the breakfast bar I wasn't sure. I ended up ordering a colour match for Benjamin Moore's Water's Edge The colour I got was not even close, it seemed periwinkle... I had to make my own colour. It is still more blue then I would have liked, but I like it.  Do not mind the lightbulbs in my hanging macrame light fixture... I realized pretty early on in this process that while they are lovely edison bulbs are not conducive to a good lighting experience.  I am rounding the finish line on this project. Hopefully tomorrow I can post an update of the finished project ❤️

Kitchen refresh

Image
So 3 children, 2 dogs and a cat later and our kitchen was hurting.  We moved into this house 11 years ago, our youngest Laken was 11, our oldest was 16... And we picked up a stray along the way, so for a few years we had 3 teenagers. Teenagers are hard on kitchens! I have a lot of nerve blaming the mess on the pets and teenagers, being a painter there is paint splatter everywhere.  We are not planning on staying here for much longer, our plan is to build on our property up north... Building supply costs may drag that out for a bit. So the easy quick fit answer is to do a refresh.  When I first set out my plan was to strip the lowers and leave them a light natural... This was a ton of work. John hated it! I secretly loved it, but decided to let him have this small win. When I started out with the original plan my time budget was 3 days... WRONG! I'm not sure if the change in the plans helped or hindered the timeline, howeve

RV 2021

Image
Hello all! It is April 2021, several years since the RV remodel on a budget. I thought I would do an update for anyone who may be wondering how it has held up. The short answer is fabulous! Our trailer is kept on our property in very cold Canada. We can't even get to it in the winter. We also shut off all services when we are not there in the summer, so it experiences extreme cold and extreme hot. The walls... Perfect, not even a touch up needed, and I have to scrub them regularly. We have dogs and grown kids, plus we are out working in the dirt everyday.  The cabinets... Also perfect, aside from the initial finish fail on the underside of the cabinets when I pulled the tape off from painting the walls Things that did not hold up well are things I may have mentioned on the original blog but had not blogged about.  I painted the leather couch. Fail. It was awful, the couch literally disintegrated after that.  It was a beautiful new to me pull out

Fall

Image
Well summer is over, bring on fall! We have spent all but one weekend up north working on the trailer and clearing mostly the poplar trees off the property. We are far from finished with any of it, but the trailer is finished for this year. In total we spent no more than $500 this far. Paint and our new to us pull out couch were the biggest purchases. On tap for next year... the bedroom headboard, a pallet wall in the family room, tile backsplash and most of all to replace the flooring and stairs. These projects will bring up the total cost quite a bit but will be so worth it. This is for sure my happy place!

RV Bedroom

Image
The bedroom/bathroom was the most difficult, it is so tight! We painted the cabinets in Benjamin Moore pale oak. The walls were painted in Woodlawn blue. Our bedding is Restoration Hardware. This room will need the most touch ups when we remove and replace the flooring next year.

Painting the RV walls

Image
I read a lot of blogs and did a lot of research before painting the walls. First off I decided to paint the cabinets before the walls, because I was pretty sure the cabinet finish would hold up to being taped off while I completed the walls. I was not sure if the opposite would be true. In order to prepare the walls I sanded and then wiped them down with tsp on a rag. One thing that I found most people recommended was to remove the border and the sticky residue. My experience was not good. The border pulled the wallpaper of underneath and is a complete mess. I wasn’t too worried because I want to put up a back splash anyways, but for now it is a mess. I used XIM UMA bonder as a primer. This primer is amazing! It goes on thin and dries almost clear. It doesn’t funk up a brush like normal primer would. It is almost like glue. Dry time was about 3 hours and then I painted the top coat. The uma worked great over the border and sticky residue(which I didn’t remove because I will be put